
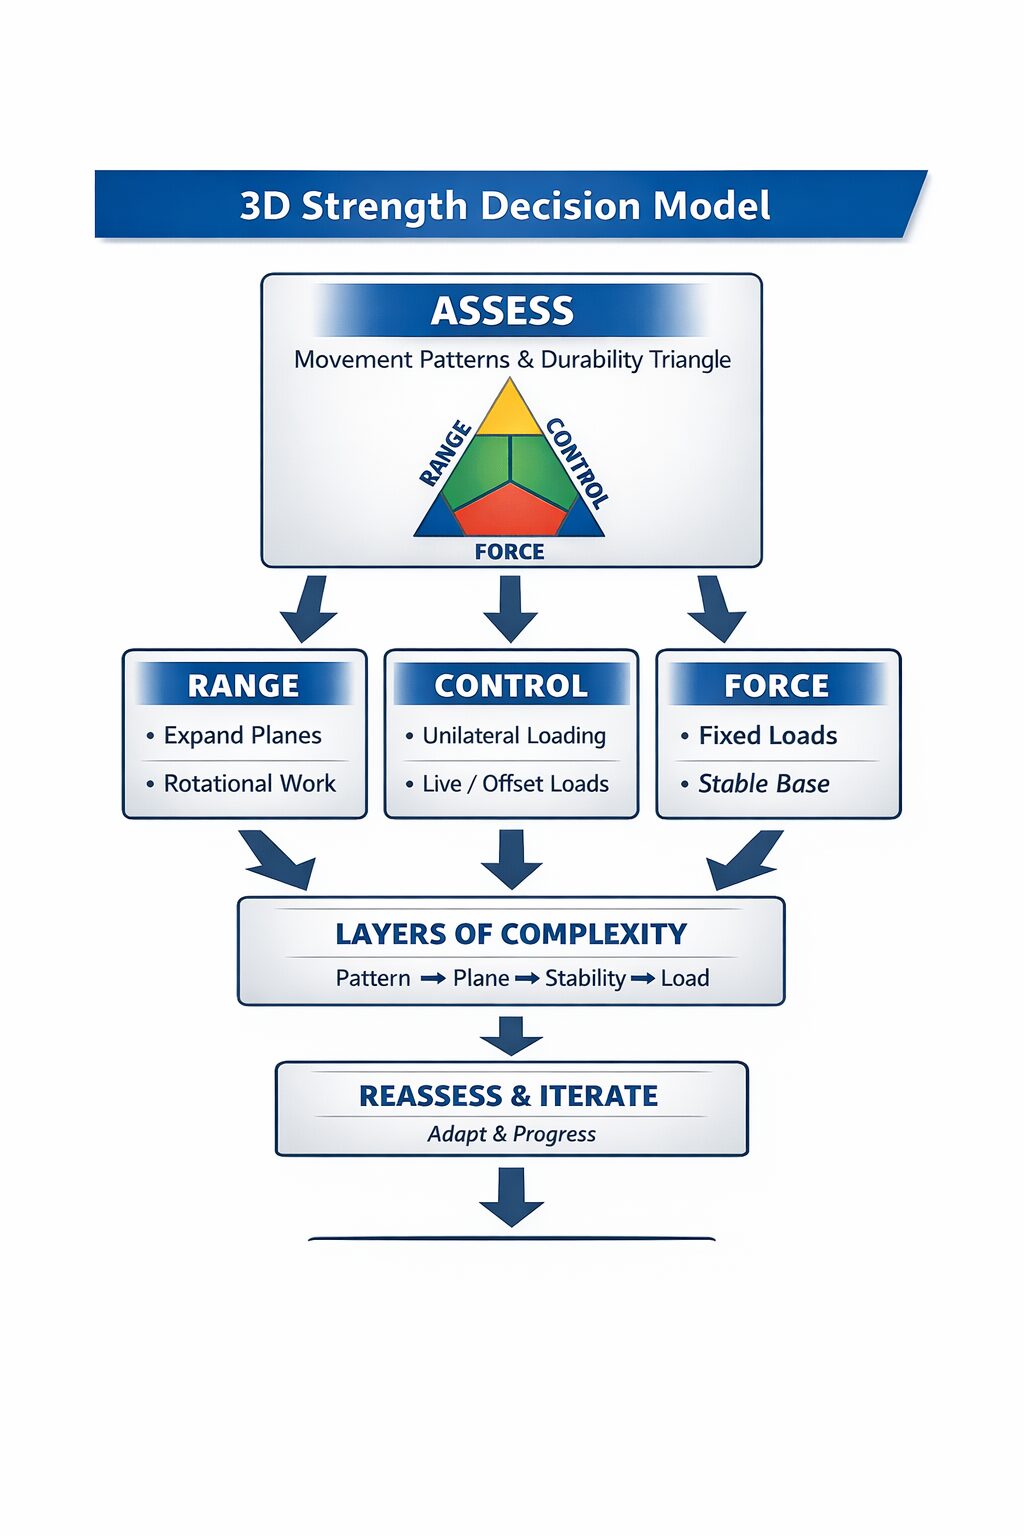
Theme: Assessment drives bias. Bias drives stress. Stress builds durability.
🎯 Teaching Objective
By the end of this lesson, the coach should be able to:
- Use assessment findings to guide programming decisions
- Identify the weakest durability pillar
- Select appropriate stress environments
- Layer complexity without rigidity
- Apply a repeatable decision-making framework
This is not a template.
It is a thinking model.
PART 1 — Why a Decision Model Exists
Most programming starts with:
Exercises.
Templates.
Preferences.
The 3D Strength System starts with:
Diagnosis.
You do not choose exercises first.
You identify imbalance first.
The 3D Decision Model is the bridge between:
Assessment
and
Programming.
PART 2 — STEP 1: Assess the Client
This mirrors Module 3.
You assess two things:
A) Movement Pattern Competence
Can they perform:
• Hinge
• Squat
• Lunge
• Push
• Pull
• Rotation
• Gait / single-leg stability
If a pattern collapses, restricts, or compensates — note it.
Patterns show you where the problem appears.
B) Durability Pillar Check
Now identify:
Which pillar is weakest?
• Range
• Control
• Force
This is the key branch point.
Movement tells you where.
The Triangle tells you why.
PART 3 — STEP 2: Identify the Weak Pillar
The flow diagram splits here.
You are not fixing exercises.
You are restoring proportion.
If RANGE Is Weak
Ask:
• Is range limited in sagittal only?
• Does it disappear under load?
• Is rotation restricted?
Bias:
→ Plane expansion
→ Rotational exposure
→ Light offset tools
→ Loaded end-range work
→ Multi-planar control
Delay:
→ Heavy bilateral grinding
→ High momentum exposure
Goal: Expand usable range without overwhelming control.
If CONTROL Is Weak
Ask:
• Do they collapse under unilateral load?
• Does posture fail under asymmetry?
• Is timing poor under speed?
Bias:
→ Unilateral loading
→ Live load
→ Offset load
→ Anti-rotation work
→ Slower tempo exposure
Delay:
→ Heavy momentum
→ High instability layering
Goal: Improve force organization before increasing intensity.
If FORCE Is Weak
Ask:
• Is output low?
• Is movement clean but underpowered?
• Is strength limited in stable environments?
Bias:
→ Fixed load
→ Stable base
→ Bilateral patterns
→ Progressive overload
Delay:
→ Reactive base
→ High instability exposure
Goal: Build output without destabilizing structure.
PART 4 — STEP 3: Apply Layers of Complexity
Once pillar bias is identified, complexity is layered responsibly.
Progression follows this order:
1️⃣ Pattern competence
2️⃣ Plane expansion
3️⃣ Stability shift (bilateral → unilateral)
4️⃣ Load behaviour selection
But…
Complexity only increases if:
Range holds.
Control holds.
Structure holds.
If quality drops → regress.
Complexity must follow capacity.
PART 5 — STEP 4: Reassess
Programming is not linear.
After a logical cycle (4–6 weeks):
Ask:
• Has the weak pillar improved?
• Has another pillar become dominant?
• Is imbalance emerging?
Then loop back to Step 1.
The system is circular, not linear.
PART 6 — What This Model Achieves
The 3D Decision Model integrates:
Triangle → Capacity
Assessment → Diagnosis
Matrix → Stress selection
Complexity → Progression
It makes programming:
Intentional
Proportional
Adaptive
Not random.
Not trendy.
Not preference-driven.
Diagram Reference (On Page)
The diagram should visually show:
Assessment
⬇
Identify Weak Pillar
⬇
Bias Complexity Layer
⬇
Select Load Behaviour
⬇
Reassess
Keep the visual clean.
The text does the explaining.
This now:
- Feels engineered
- Matches the system architecture
- Doesn’t repeat earlier lessons
- Sets up Layers of Complexity perfectly